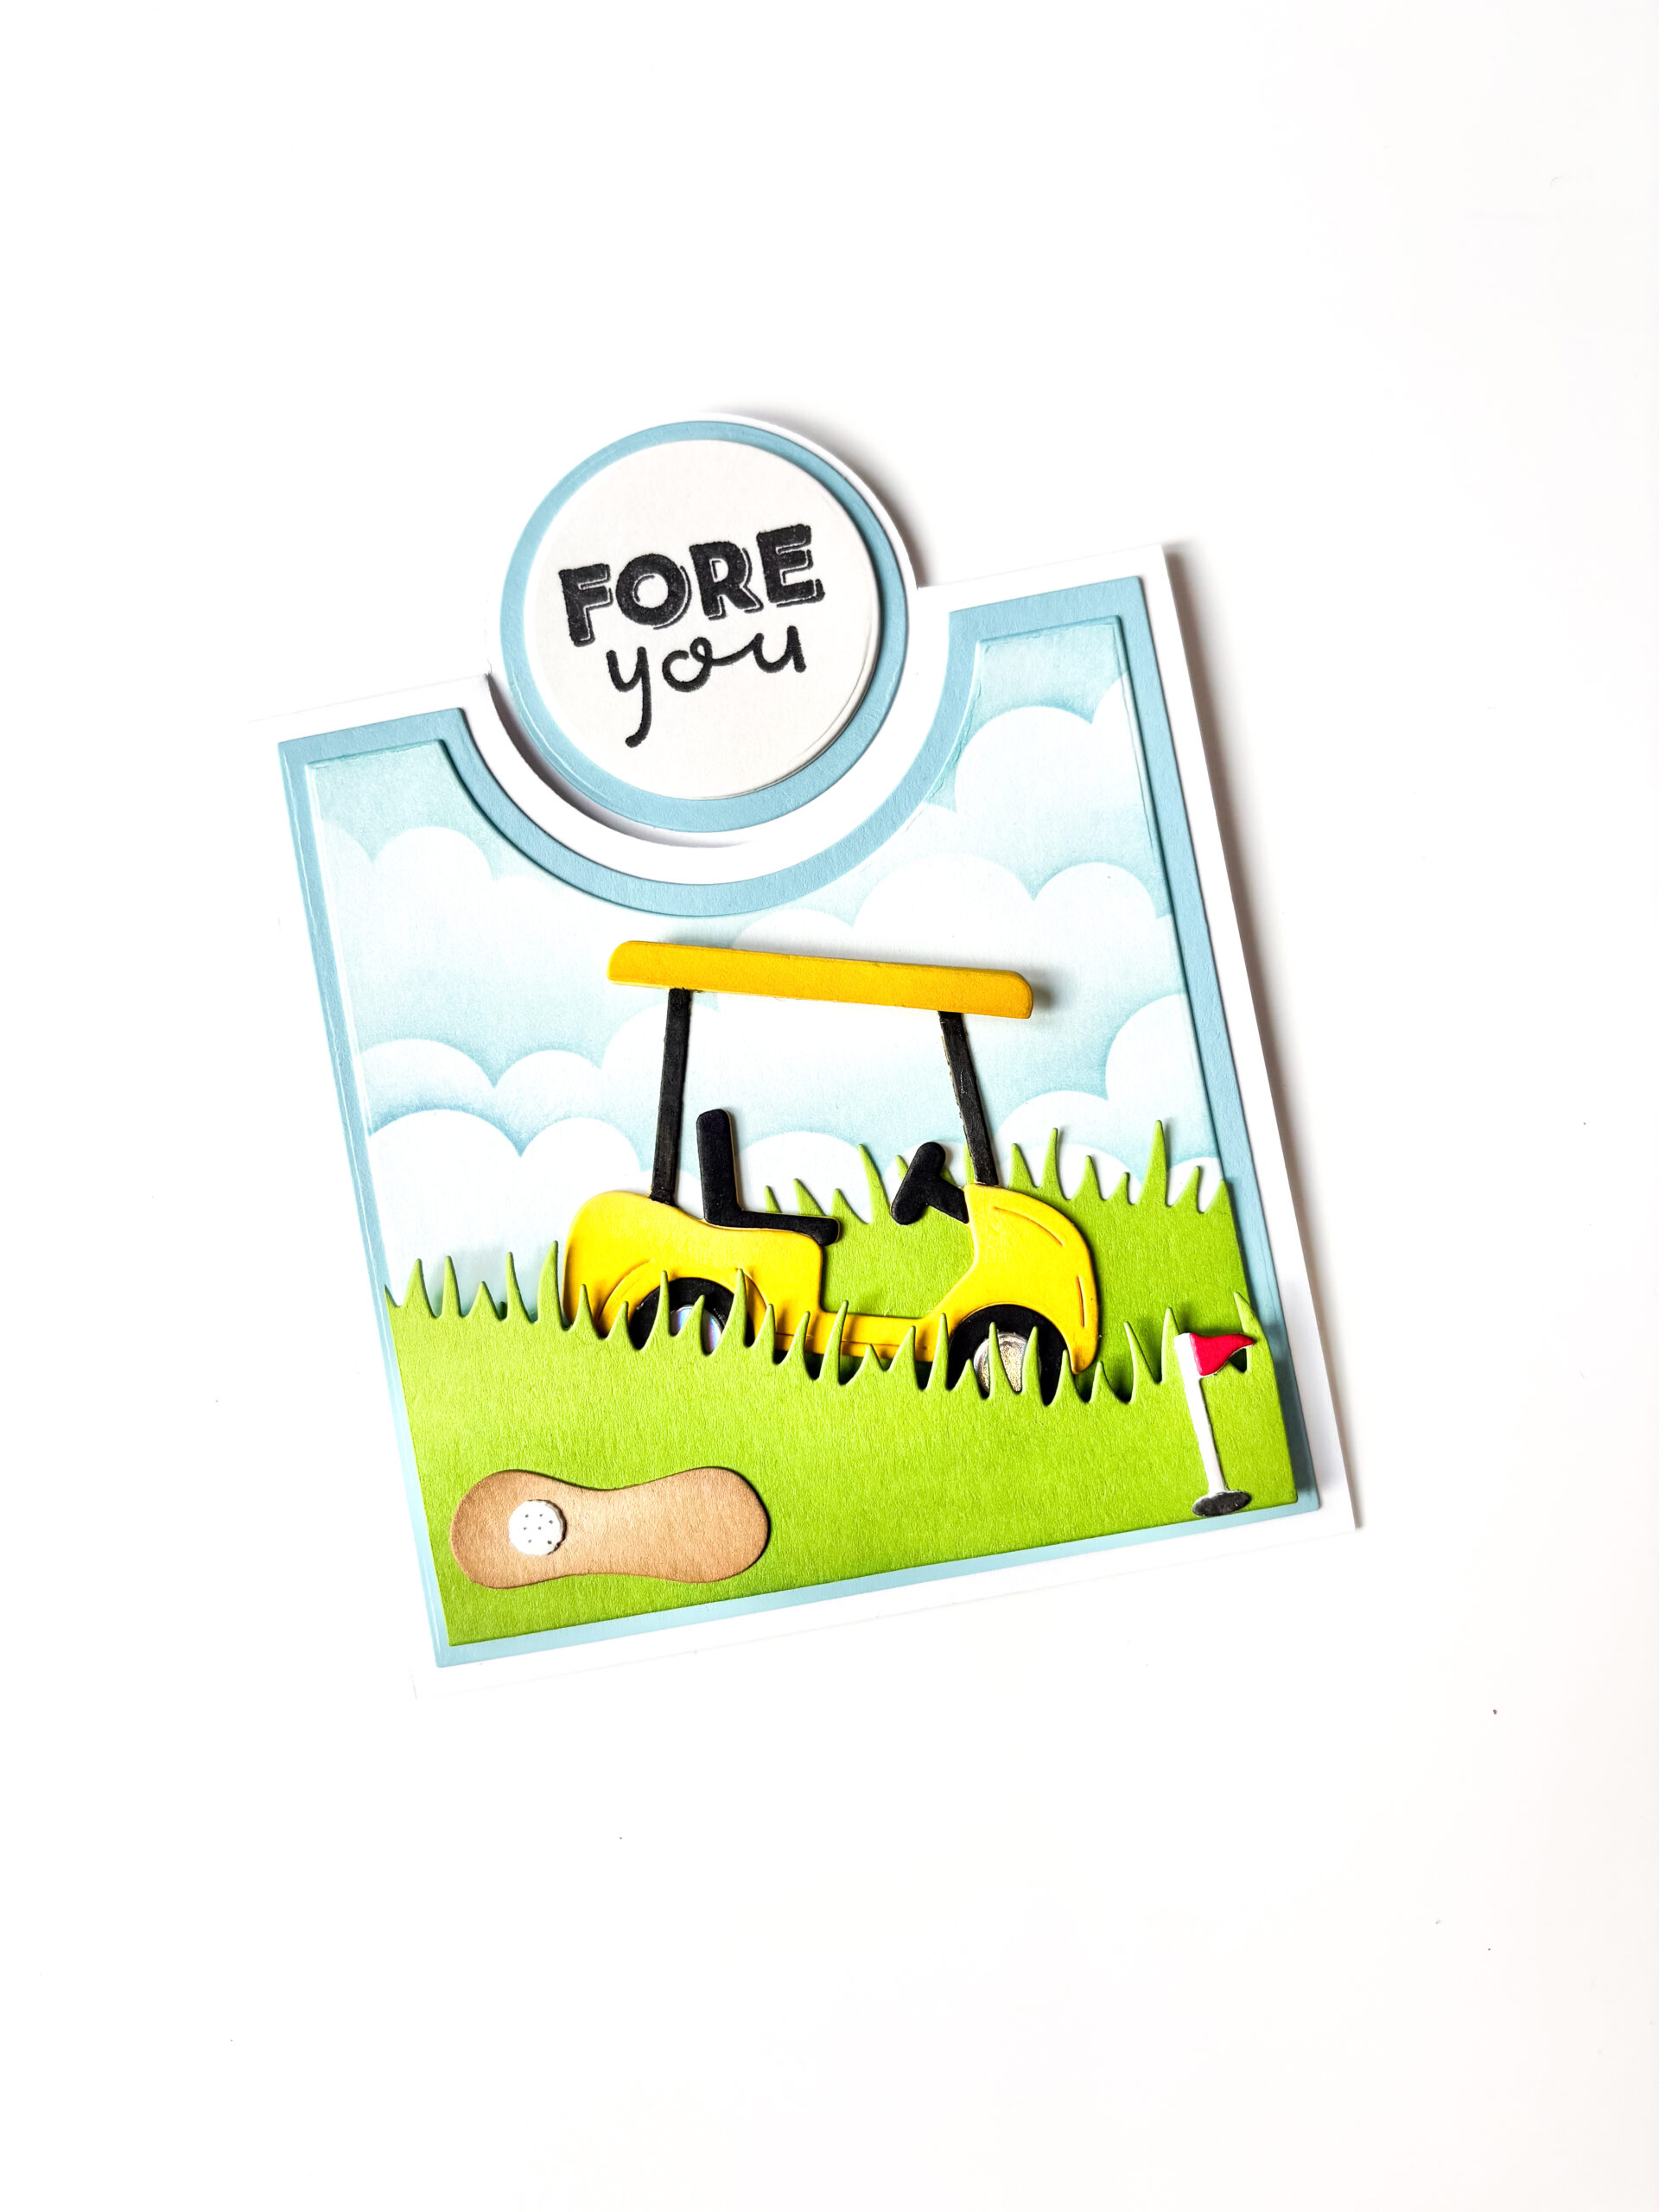
Today I’m sharing a handmade card titled “Fore You” featuring products from Taylored Expressions. It would be perfect for birthdays, Father’s Day, retirement, or anyone who loves spending time on the golf course. I started with a bib card base from The Paper Cut and layered the card using coordinating dies. Building the background of the card was so much fun using a cloud stencil and the Grassy Hillside Pop Up Dies from Lawn Fawn. One of the things Im trying to do lately is to mix dies, stamps and backgrounds by using the products I already have in my craft room. This card came together so quickly. I hope you enjoy! Below are the supplies I used to create this card. Unfortunately, I wasn’t able to link to the products for the bib card and layers. If you would like to purchase those, I would go directly to The Paper Cut.
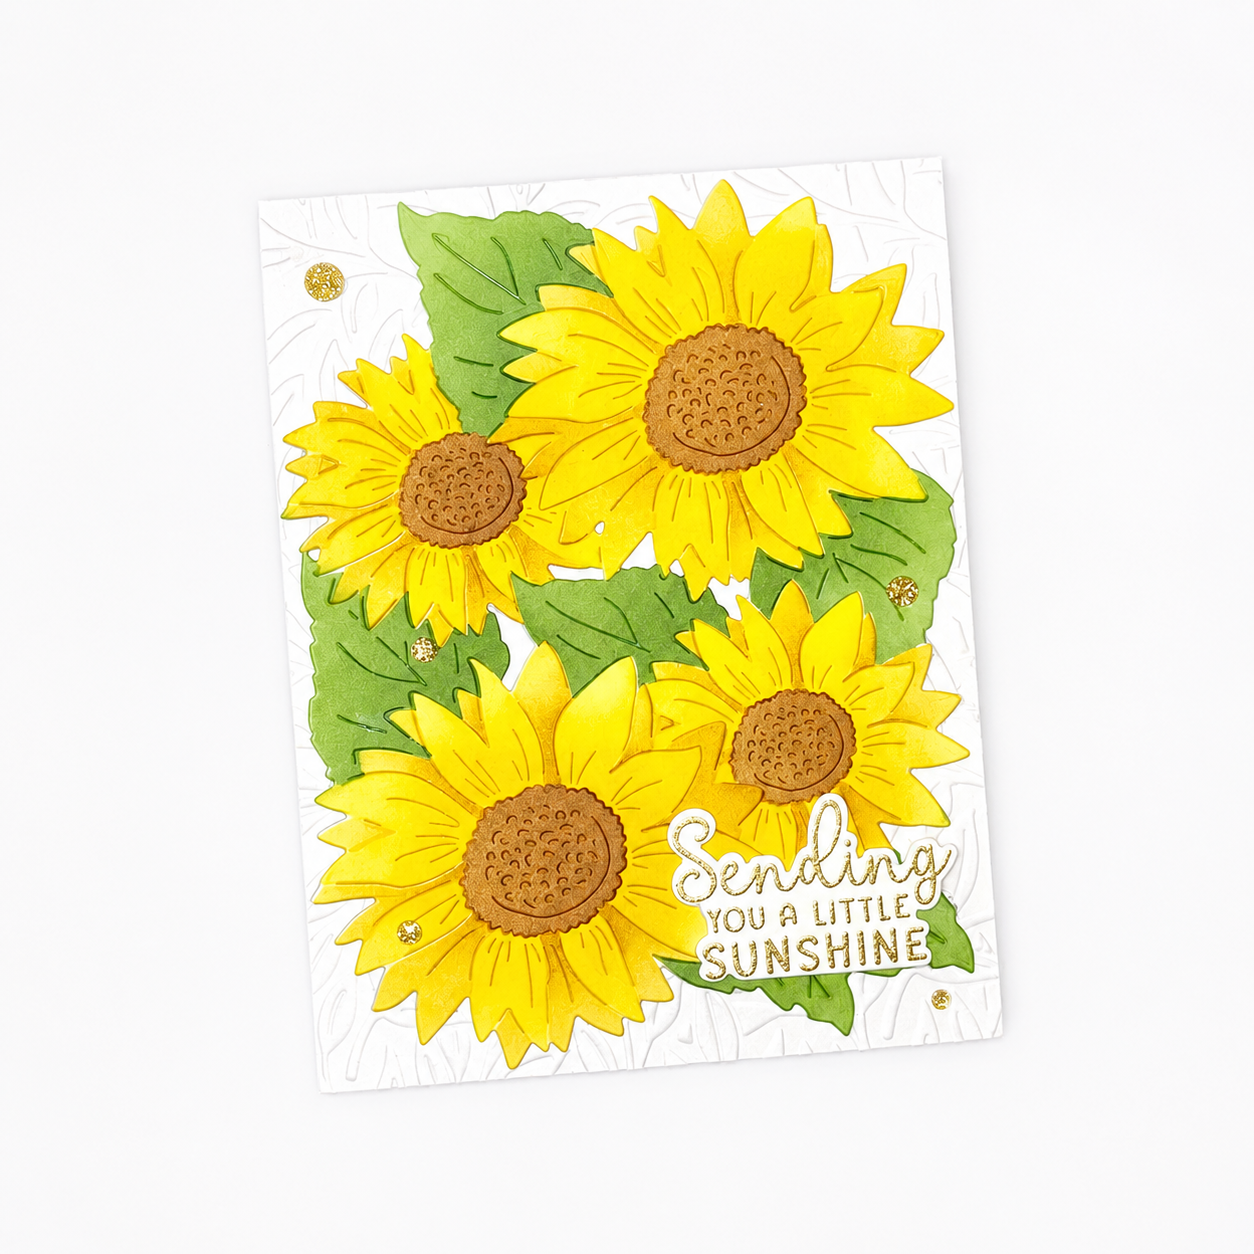
A Card That Feels Like Sunshine
There’s something about sunflowers that instantly make you smile. They’re bright and full of warmth. Today’s card combines texture, a little bit of dimension and color using supplies from some of my favorite stamping companies. I started with an embossing folder from Spellbinders, Branching Out. It creates a beautiful background that gives enough detail without taking anything away from the focal point of the card. For the focal point of the card, I used the Sunflower Cluster from Waffle Flower and used the coordinating stencils to blend ink of warm yellows and browns. I decided that I wanted to add a little dimension to the card. I die cut two more sunflowers and glued them all together for slight dimension. To finish the card, I added a sentiment form Taylored Expressions, Shine So Bright. These sentiments fit perfectly with this sunny theme. No card is complete without adding a little bling. I did this with adding some Gold Glitter Drops. If you’re looking for a way to brighten someone’s day, this sunflower card is like a little piece of sunshine in an envelope.
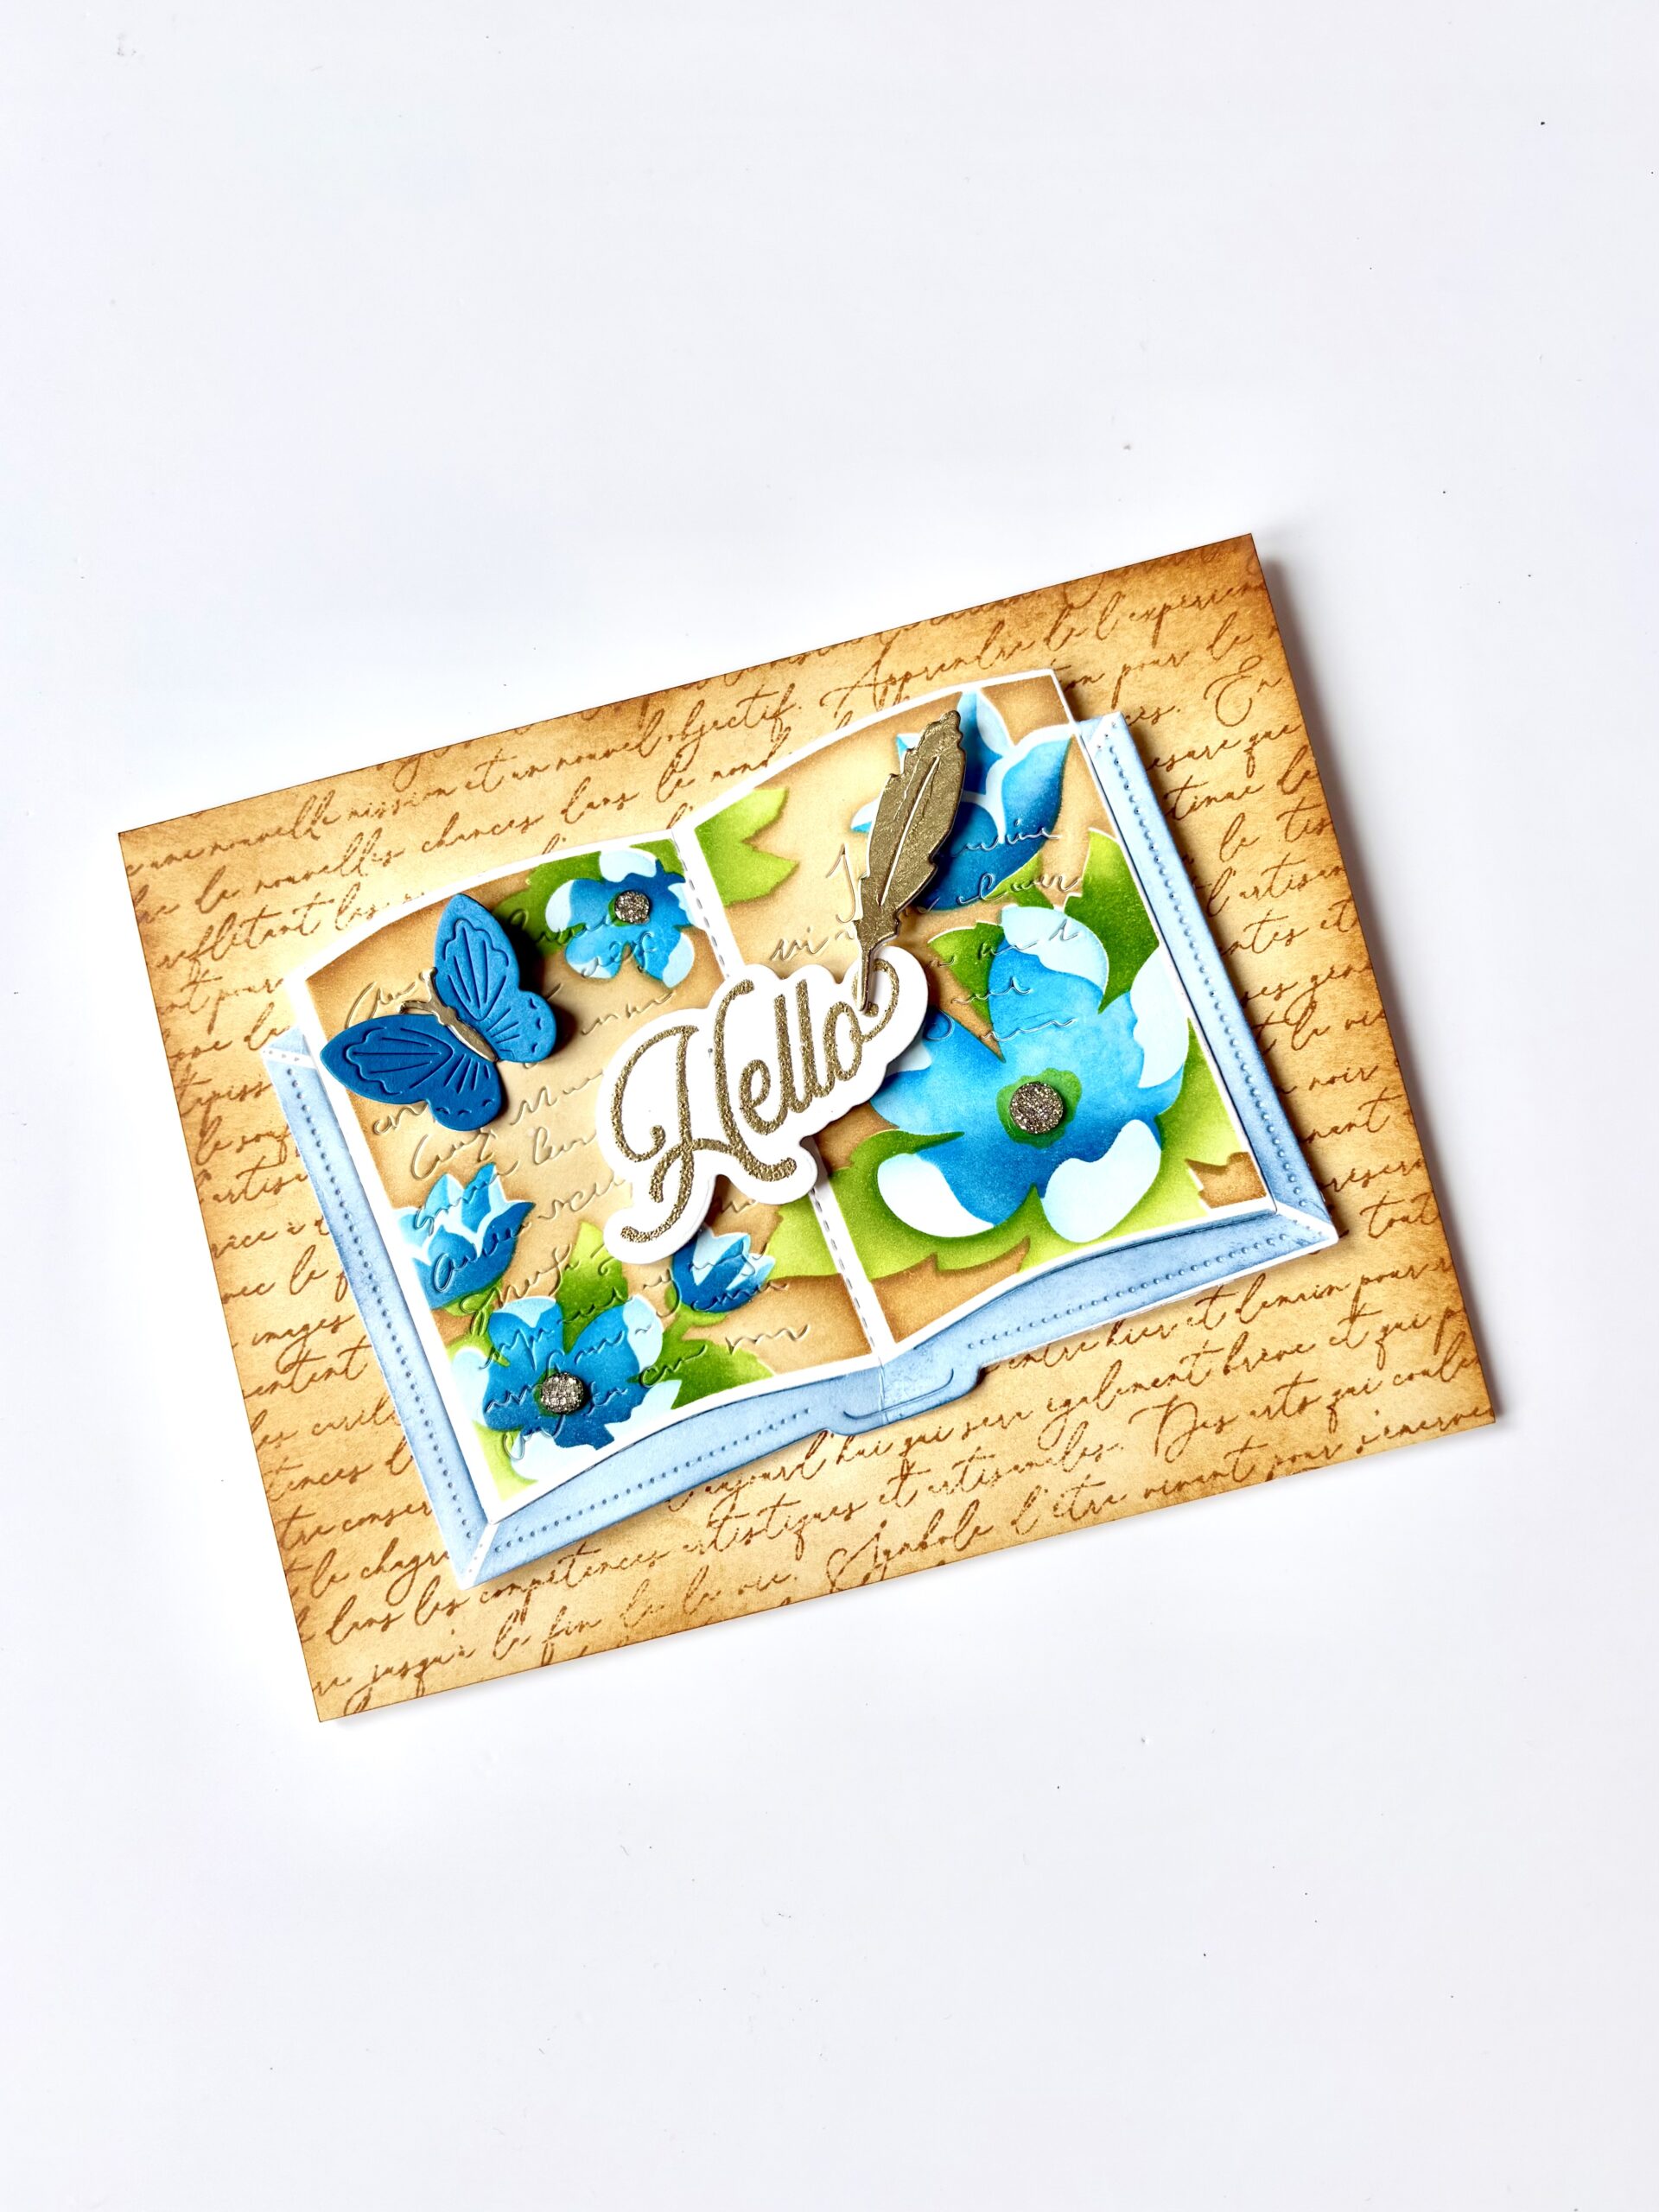
A Story Book Hello
Hello crafty friends! Today’s card is using the Open Book dies and coordinating stencils from Waffle Flower. I created a dimensional card that feels like a page straight out of a whimsical garden. The background design is the Fineline Script stamp from Taylored Expressions. I stamped the background using Brushed Corduroy. Then I ink blended the background with Antique Linen and Brushed Corduroy to give it a vintage feel. When creating the book, I used the Open Book Floral stencil. It created beautiful blended flowers. A few gem centers added just enough sparkle. Now for the final touches. The gold embossed “Hello” sentiment is popped up in the center. I added a gold feathered pen. I felt the gold accents added some elegance to the card. As many of you know, I love butterflies. I couldn’t resist adding one to bring a little more of a whimsy feel to the card. I hope you enjoyed today’s card. Below are the supplies that I used to create this open book card.
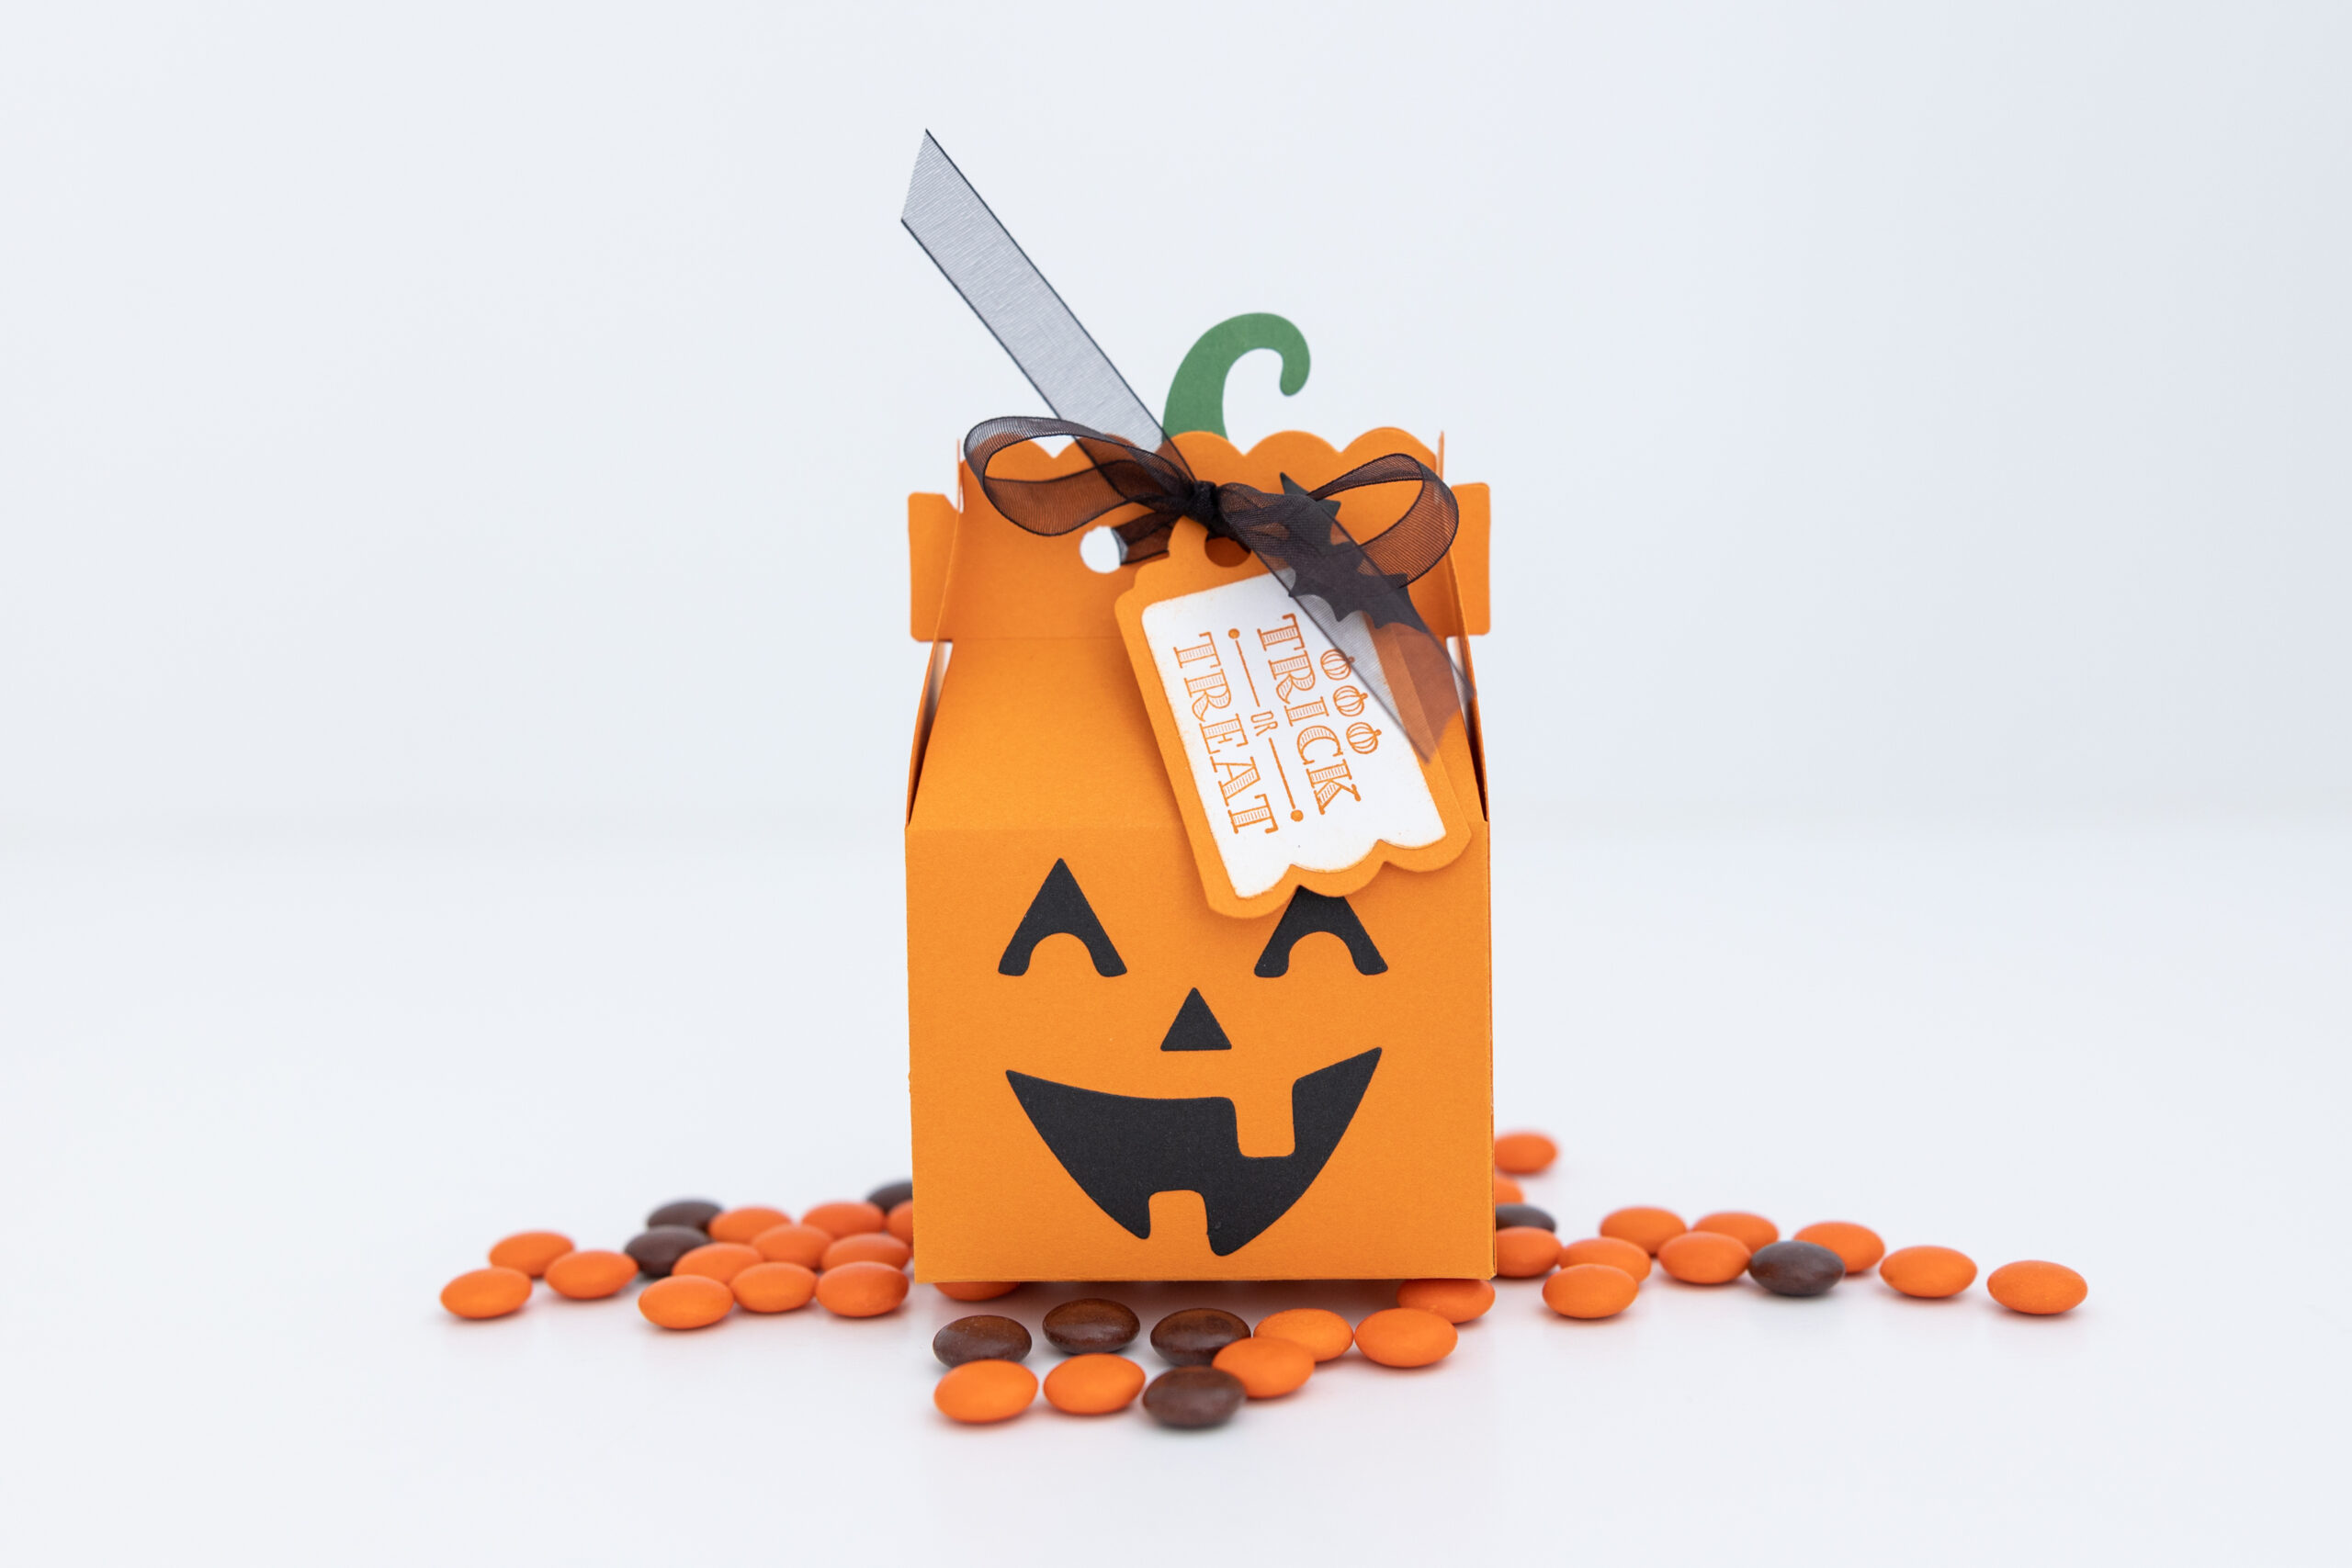
Wickedly Fun Jack-O’-Lantern Treat Boxes
Jack-O’-Lantern treat boxes are a delightful and creative way to celebrate Halloween. They add a personal touch to your festivities and are sure to bring smiles to both children and adults. So, gather your crafting supplies and come along with me as we make these cute treat boxes. I used a Sizzix gable box die that is no longer available, but I found one that is compatible. I die cut the box out of Pumpkin Pie cardstock from Stampin Up! I glued the box together and gave it a few minutes to dry. When gluing treat boxes together, my preferred glue is Zip Dry. It’s strong, dries clear, and I can rub the excess off without damaging the paper. I then die cut the facial features of the Jack-O’-Lantern from black cardstock. I adhered them carefully with a Zig fine tip glue pen. The easiest way to center the face was to adhere the mouth first, followed by the eyes, and then ended with the nose. The stem is glued to the inside of the box. For extra flair, I added a tag with an adorable bat and tied it on with some black ribbon. Now that you have your adorable Jack-O’-Lantern box ready, it’s time to fill it with treats. Below are the supplies that I used to create the treat box. If you’re not so crafty, you can head over to https://jessiedscraftythings.etsy.com and purchase them directly from me. Happy haunting!
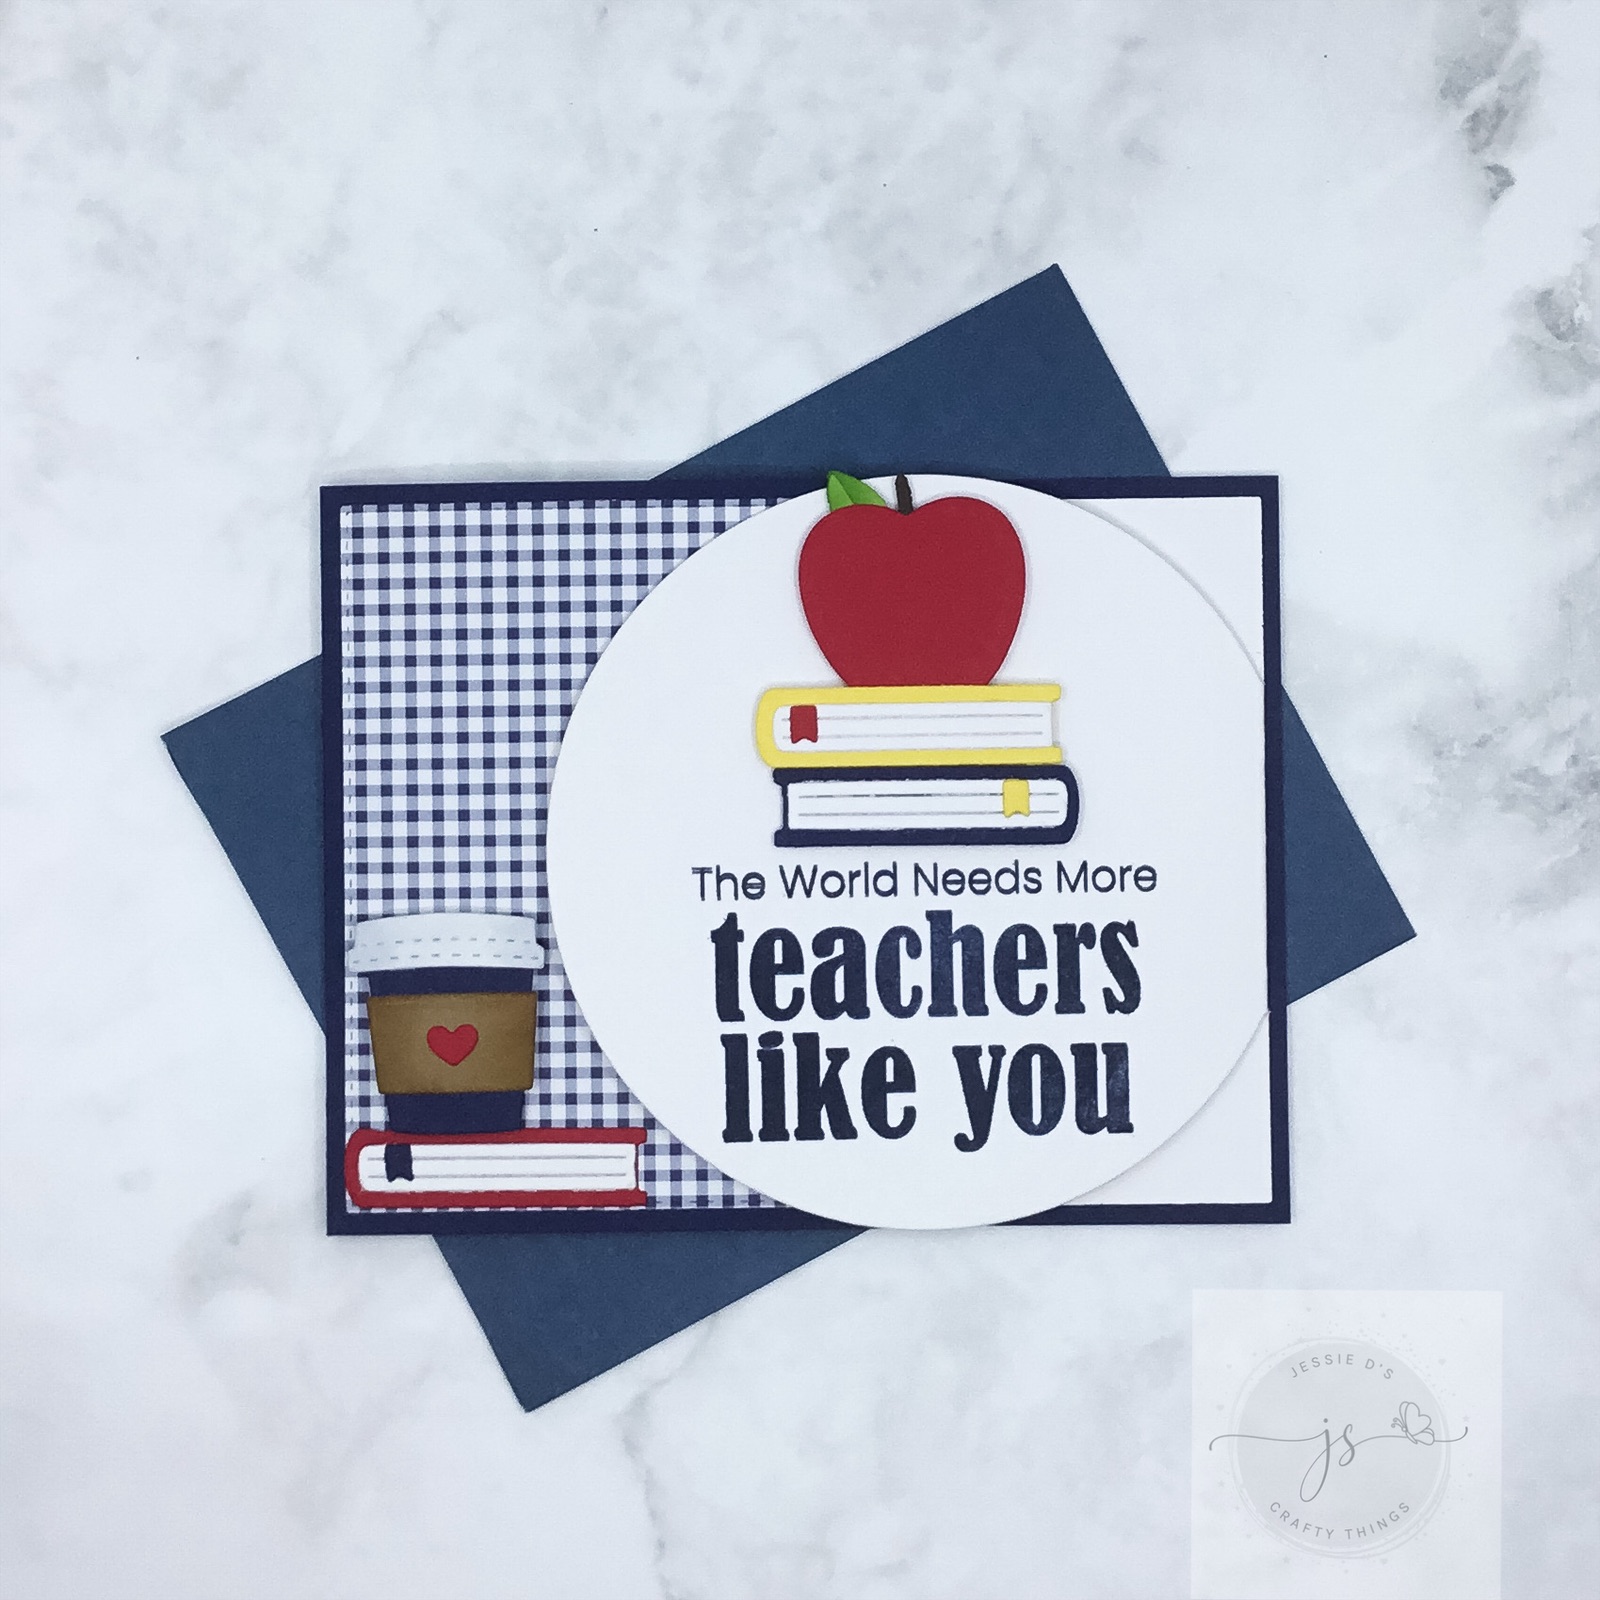
Teacher Appreciation Week with My Favorite Things
Hello crafty friends! Next week is Teacher Appreciation Week, and this card is a great way to thank that educator that has invested in your child all year. This card spotlights the stamp set Teach, Sleep, Repeat and the Back to School Dienamics from My Favorite Things. I started with the Angel Side Circle Card Die from Creek Bank Creations as my base. I am obsessed with this fun fold die that adds such a unique look to a standard A2 card. Using the Misti Tool, I stamped my saying in navy ink several times to get a good impression. I die cut, ink blended and assembled the books, apple and coffee cup from scrap pieces of cardstock. Using foam tape, I adhered the die cuts on the front of the card. I hope you enjoyed today’s card. Below are the supplies that I used to create this card.
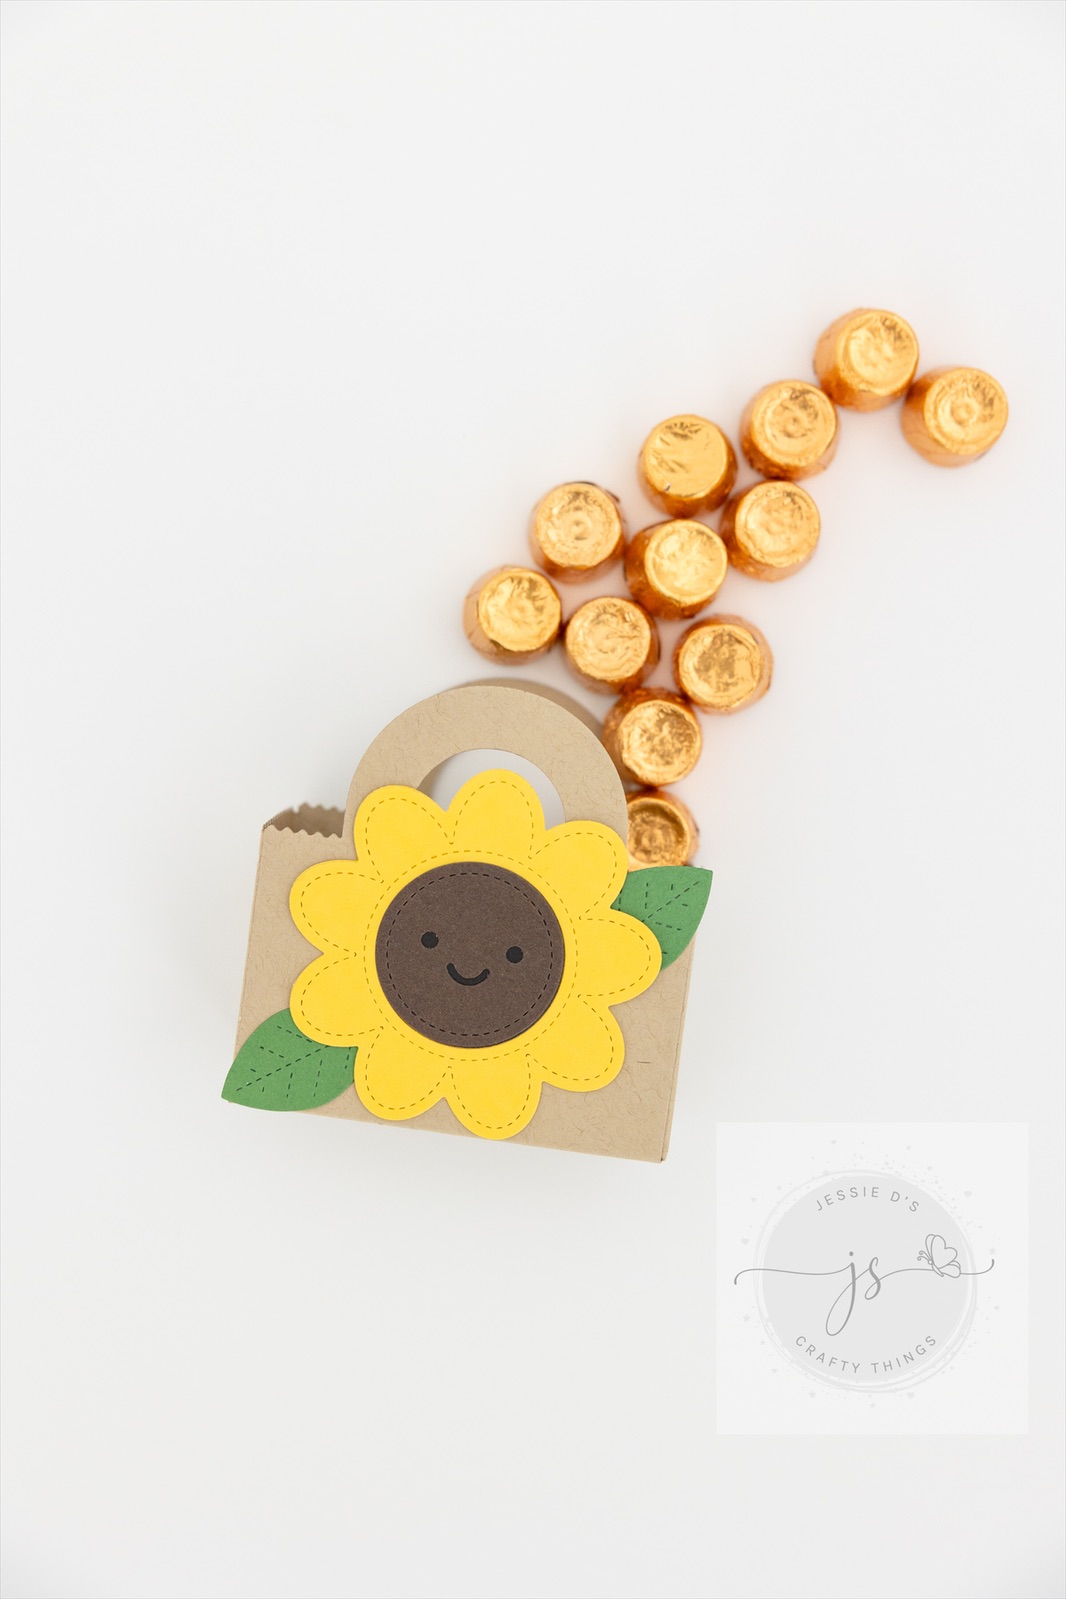
Floral Friday with Lawn Fawn
Hello crafty friends! Welcome back to Floral Friday. Today’s project is a a cute treat bag that is certain to brighten someone’s day. This project came together very quickly with simple die cutting from Lawn Fawn’s Stitched Flower Frames and Tote Bag dies. These cute sunflower treat bags can be used for many things throughout the year. I added a bag of candy and a gift card and gifted it to a friend that needed a little sunshine to brighten her day. These are perfect for sunflower themed parties, spring parties , bridal showers and teacher gifts. Below are all the supplies used, I hope you enjoyed today’s Floral Friday.
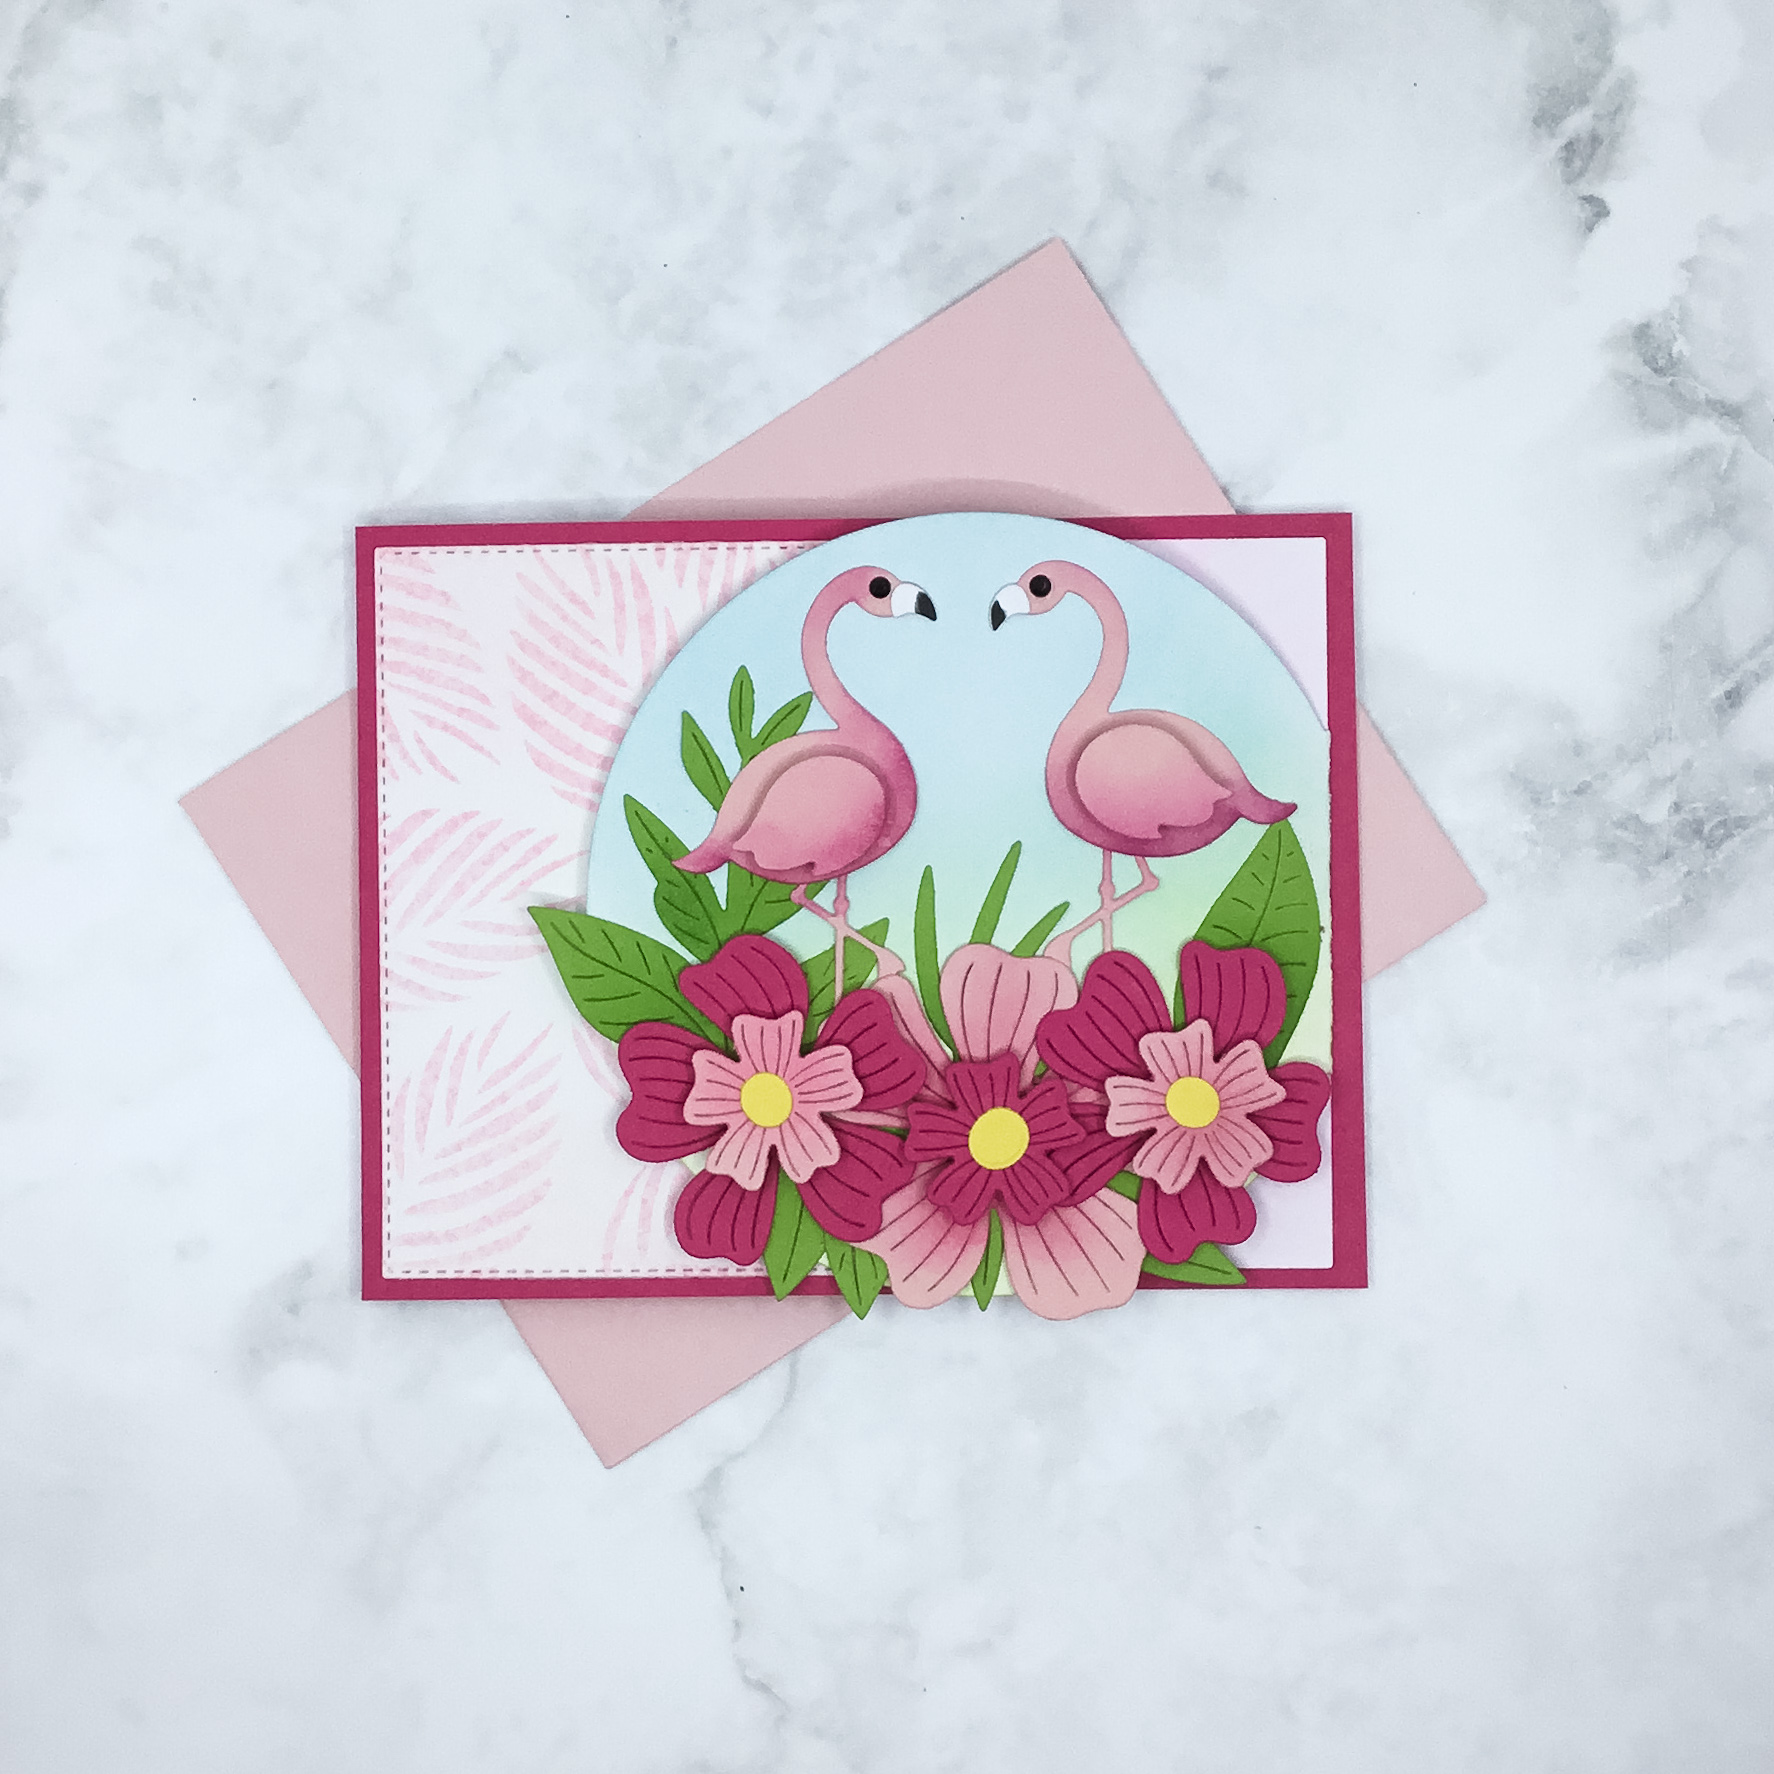
I’m Tickled Pink with My Favorite Things’ Vault Release!
This past weekend I attended the Stamp and Scrapbook Expo in Orlando. I purchased a new interactive die that I just couldn’t wait to get home and try; the Side Circle Card Die from Creek Bank Creations. Summer is around the corner and I felt this flamingo themed card was a good introduction to our tropical weather here in Florida. I started by die cutting the Side Circle Die out of Bristol Smooth Cardstock. I then ink blended Tumbled Glass and Twisted Citron Distress Inks on the circle for a soft background and added stenciled tropical leaves on the stitched rectangle accent piece. Then the die cutting and ink blending began with the Bold Blooms and Greenery die sets. I was so happy on how this card came together. I think it turned out FLAMAZING!
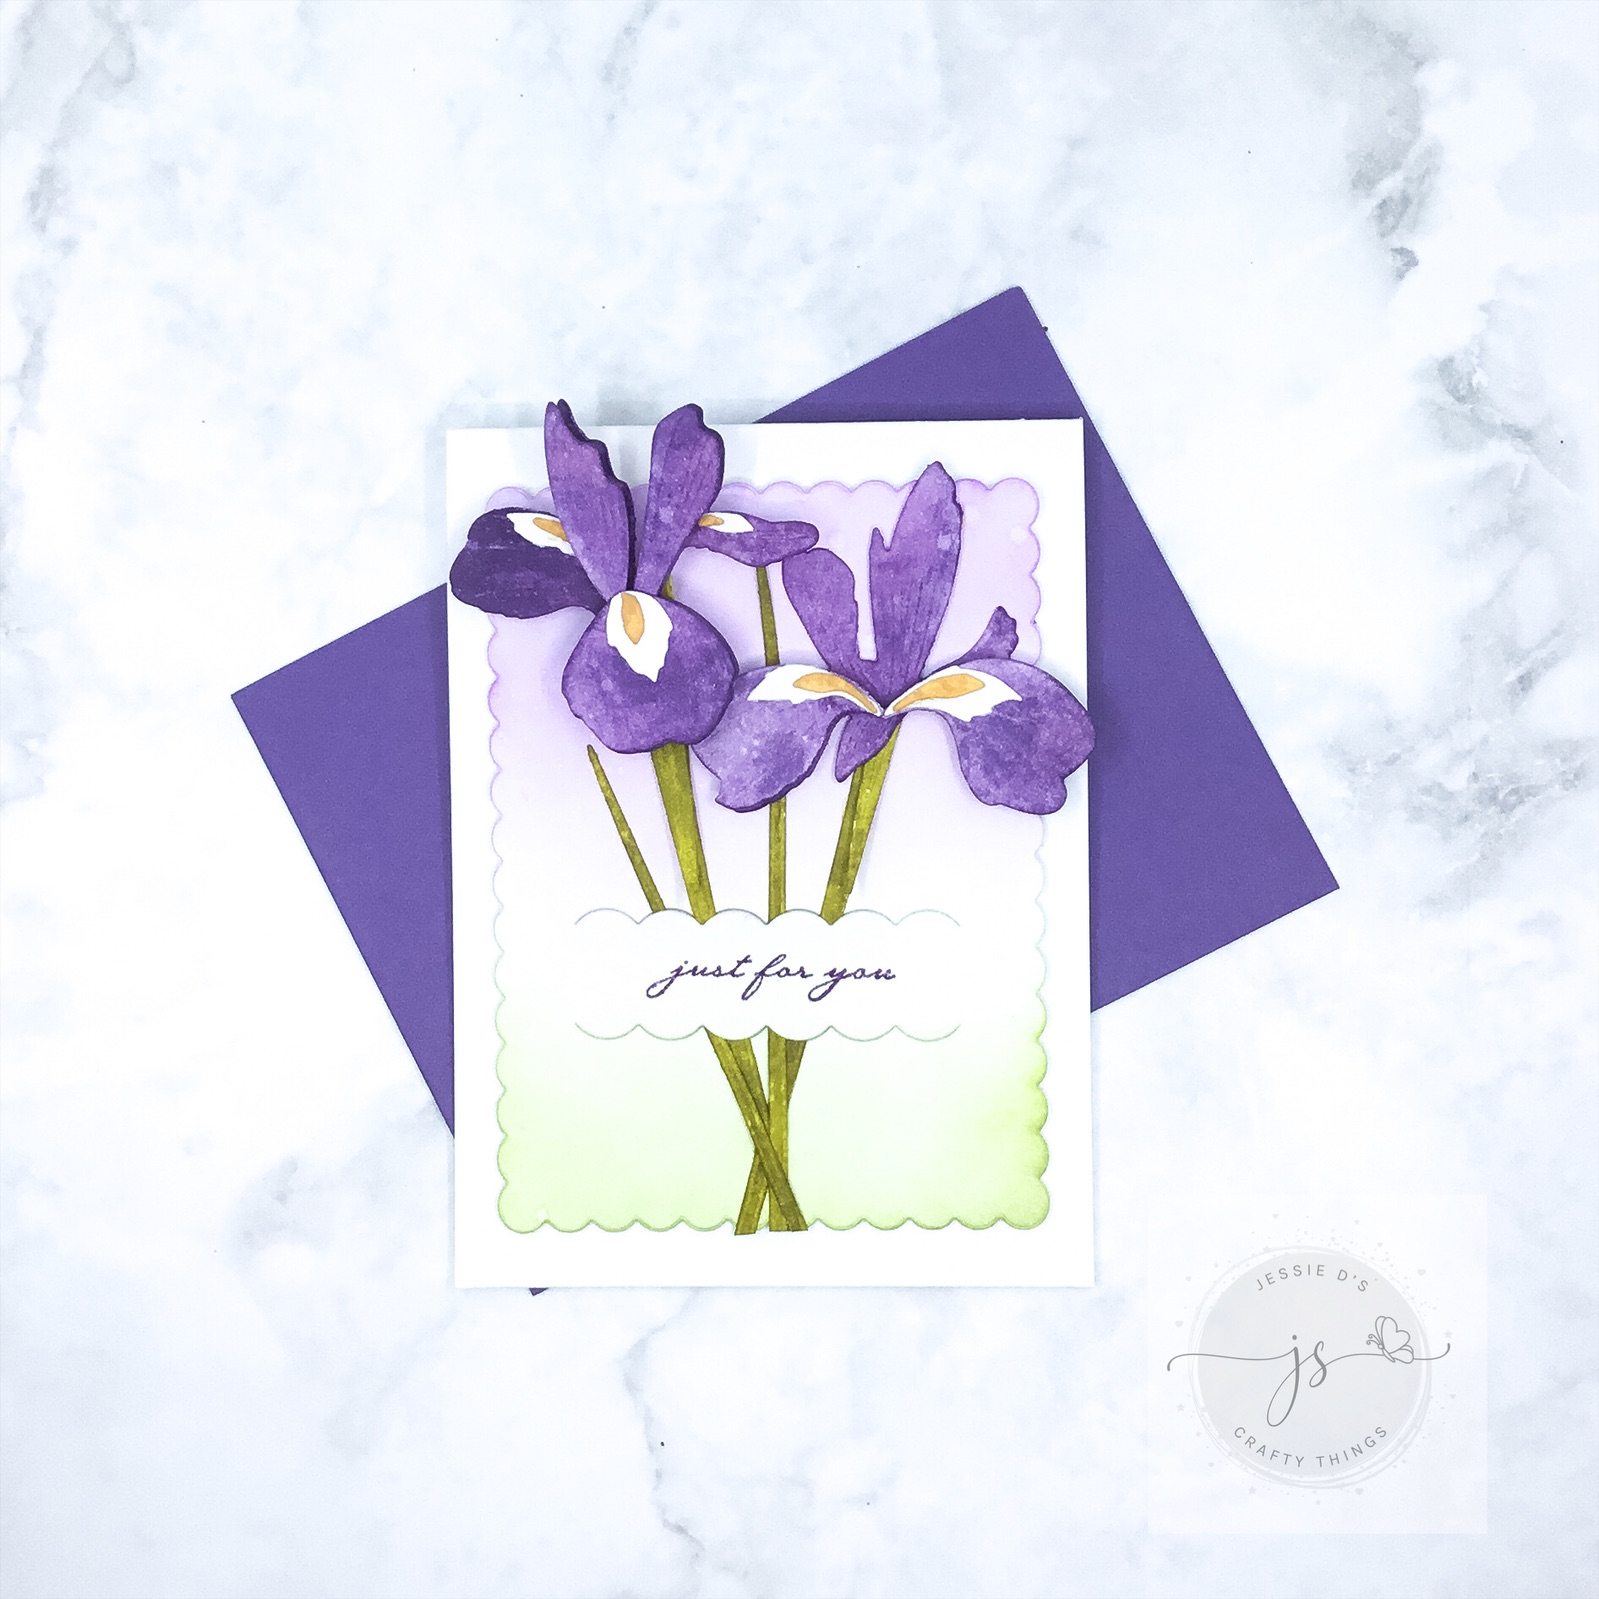
Floral Friday with Papertrey Ink – Into the Blooms: Iris
Hello crafty friends! Welcome back to Floral Friday. Today I am sharing a floral card featuring stamps and dies from Papertrey Ink. As I’ve told you in previous posts, I am not fond of coloring with watercolor pencils or Copic Markers, that is just not where my talents lie. I have been watching a lot of videos using the ink smooshing technique, so I thought I would give it a try. I used the Into the Blooms: Iris Die set, Tuck It Sentiments stamps and coordinating dies. After die cutting all of the Iris pieces, I started inking up a piece of plastic with some distress ink and then spritzing the ink with water. After my surface was ready, I took my dies and started smooshing them into the ink. I continued ink smooshing until I achieved the color that I wanted. I did allow it to dry for a few minutes between each smooshing. I used a scalloped die set from Taylored Expressions and the same inks to blend the background. I then die cut the tuck it die and started assembling the card. After the card was assembled, I used some perfect pearls with water to give it some shine. Below are all the supplies used, I hope you enjoyed today’s Floral Friday.
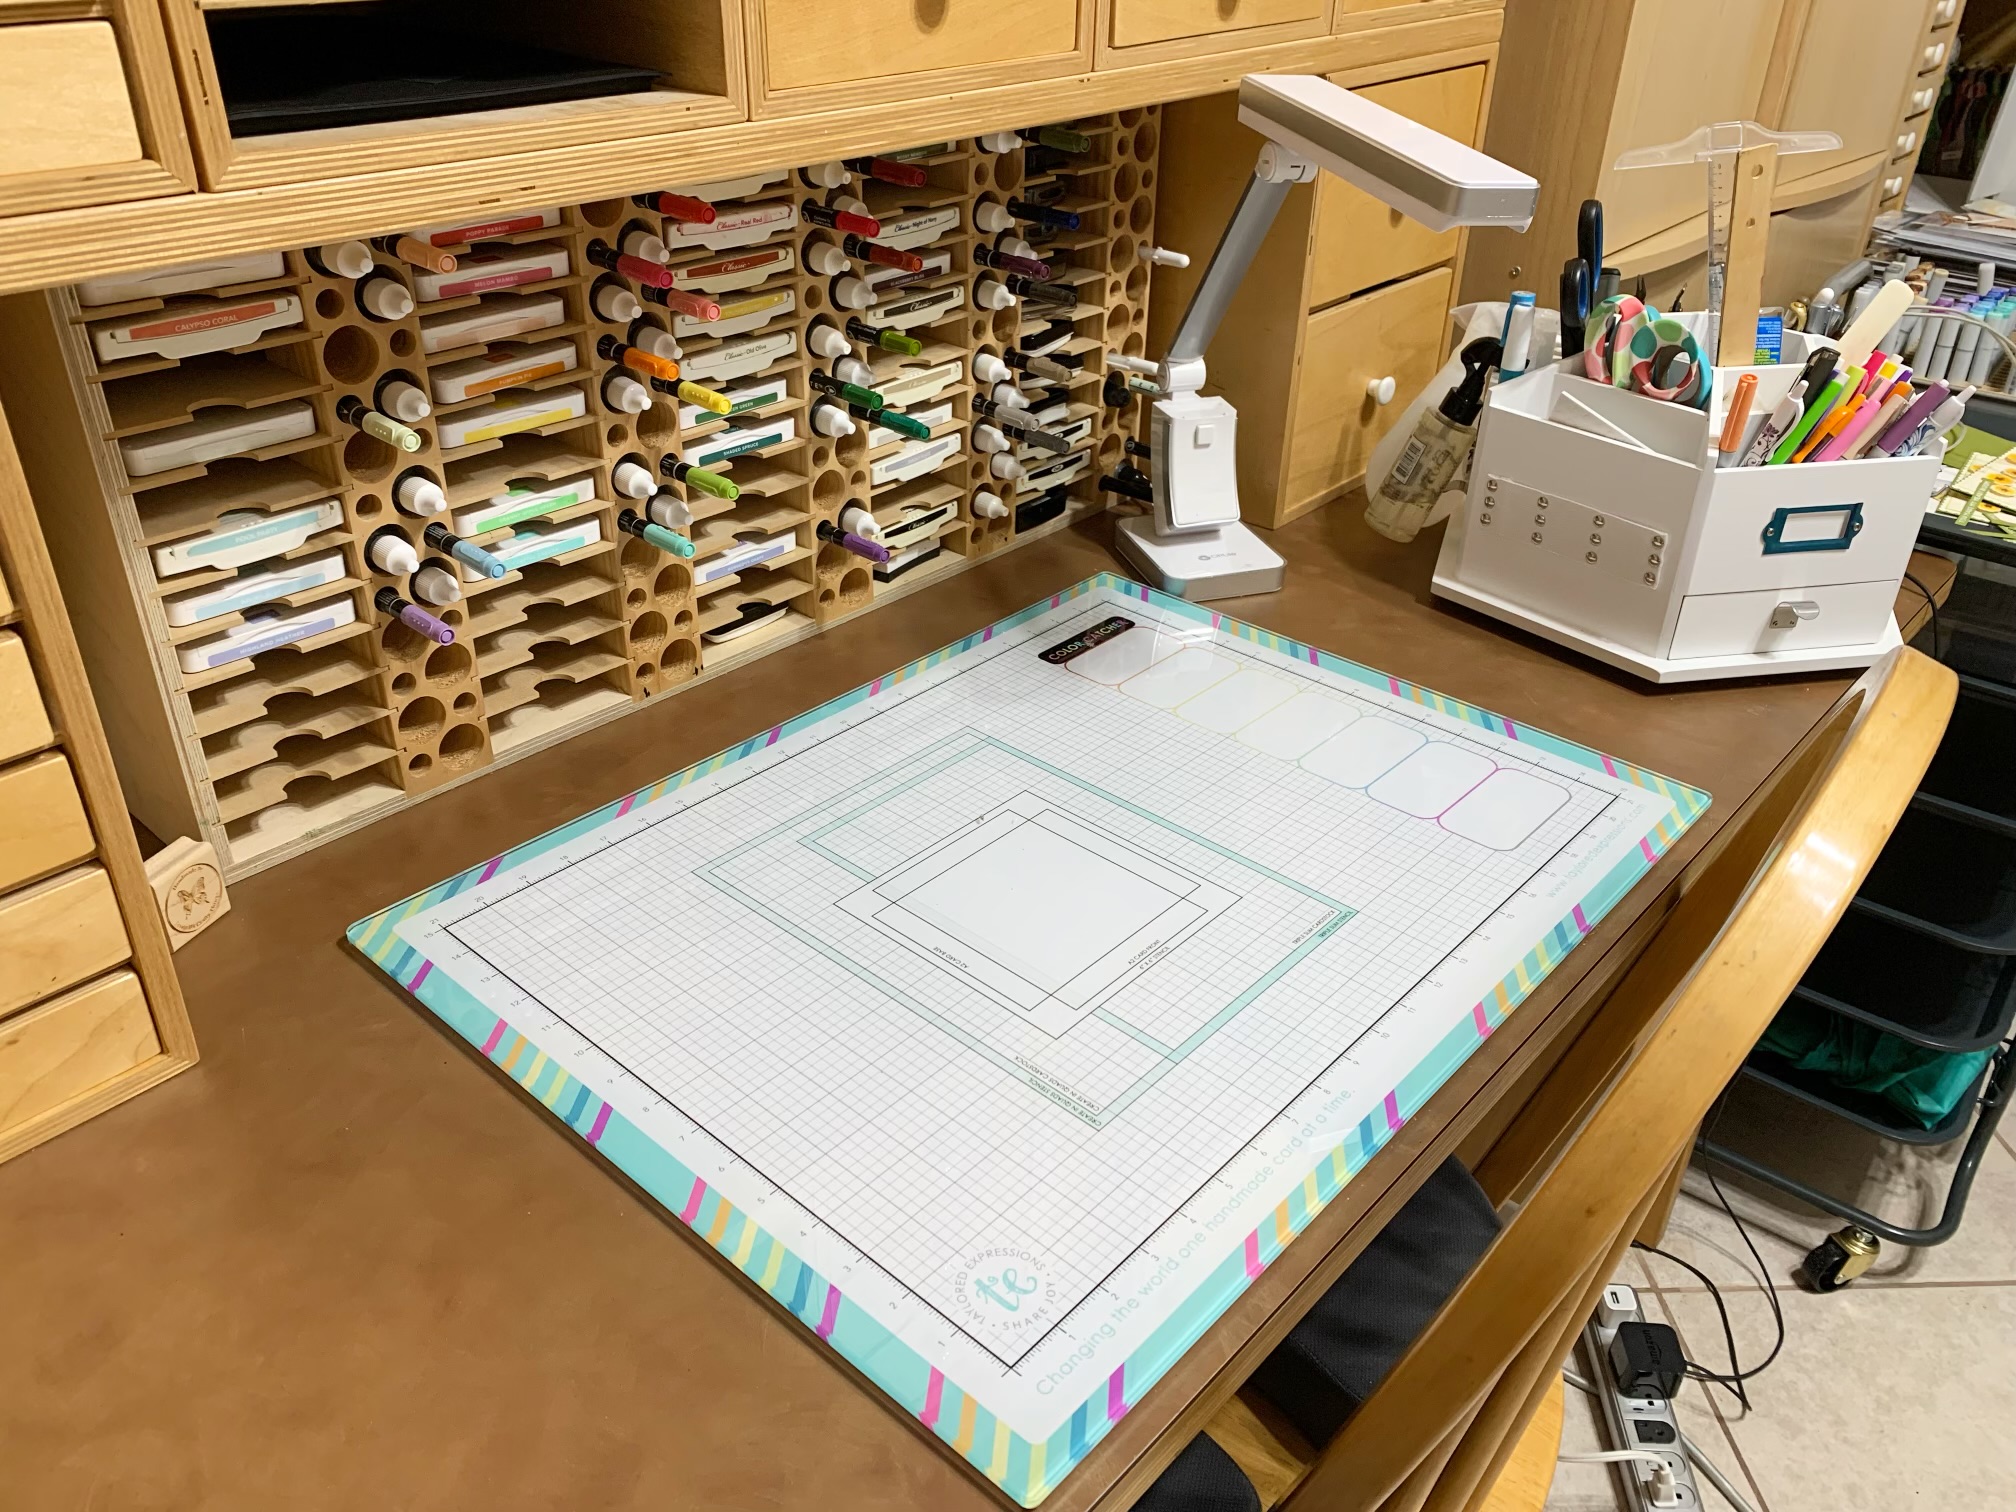
My Favorite Taylored Expressions’ Tool
One of my favorite companies in the stamping world is Taylored Expressions. They released their large glass mat last year and I am absolutely in love with it. I previously used a Tim Holtz glass mat on my main work surface, but this beauty has taken its place. These are some of the things that I feel make this glass mat stand out: I still love and use my Tim Holtz glass mat and I keep it in another area of my craft room where I am working on some other projects. It will. always be my first love. If you are considering the Taylored Expressions glass mat it is currently out of stock, but, the next preorder begins April 23, 2024. Don’t miss out.
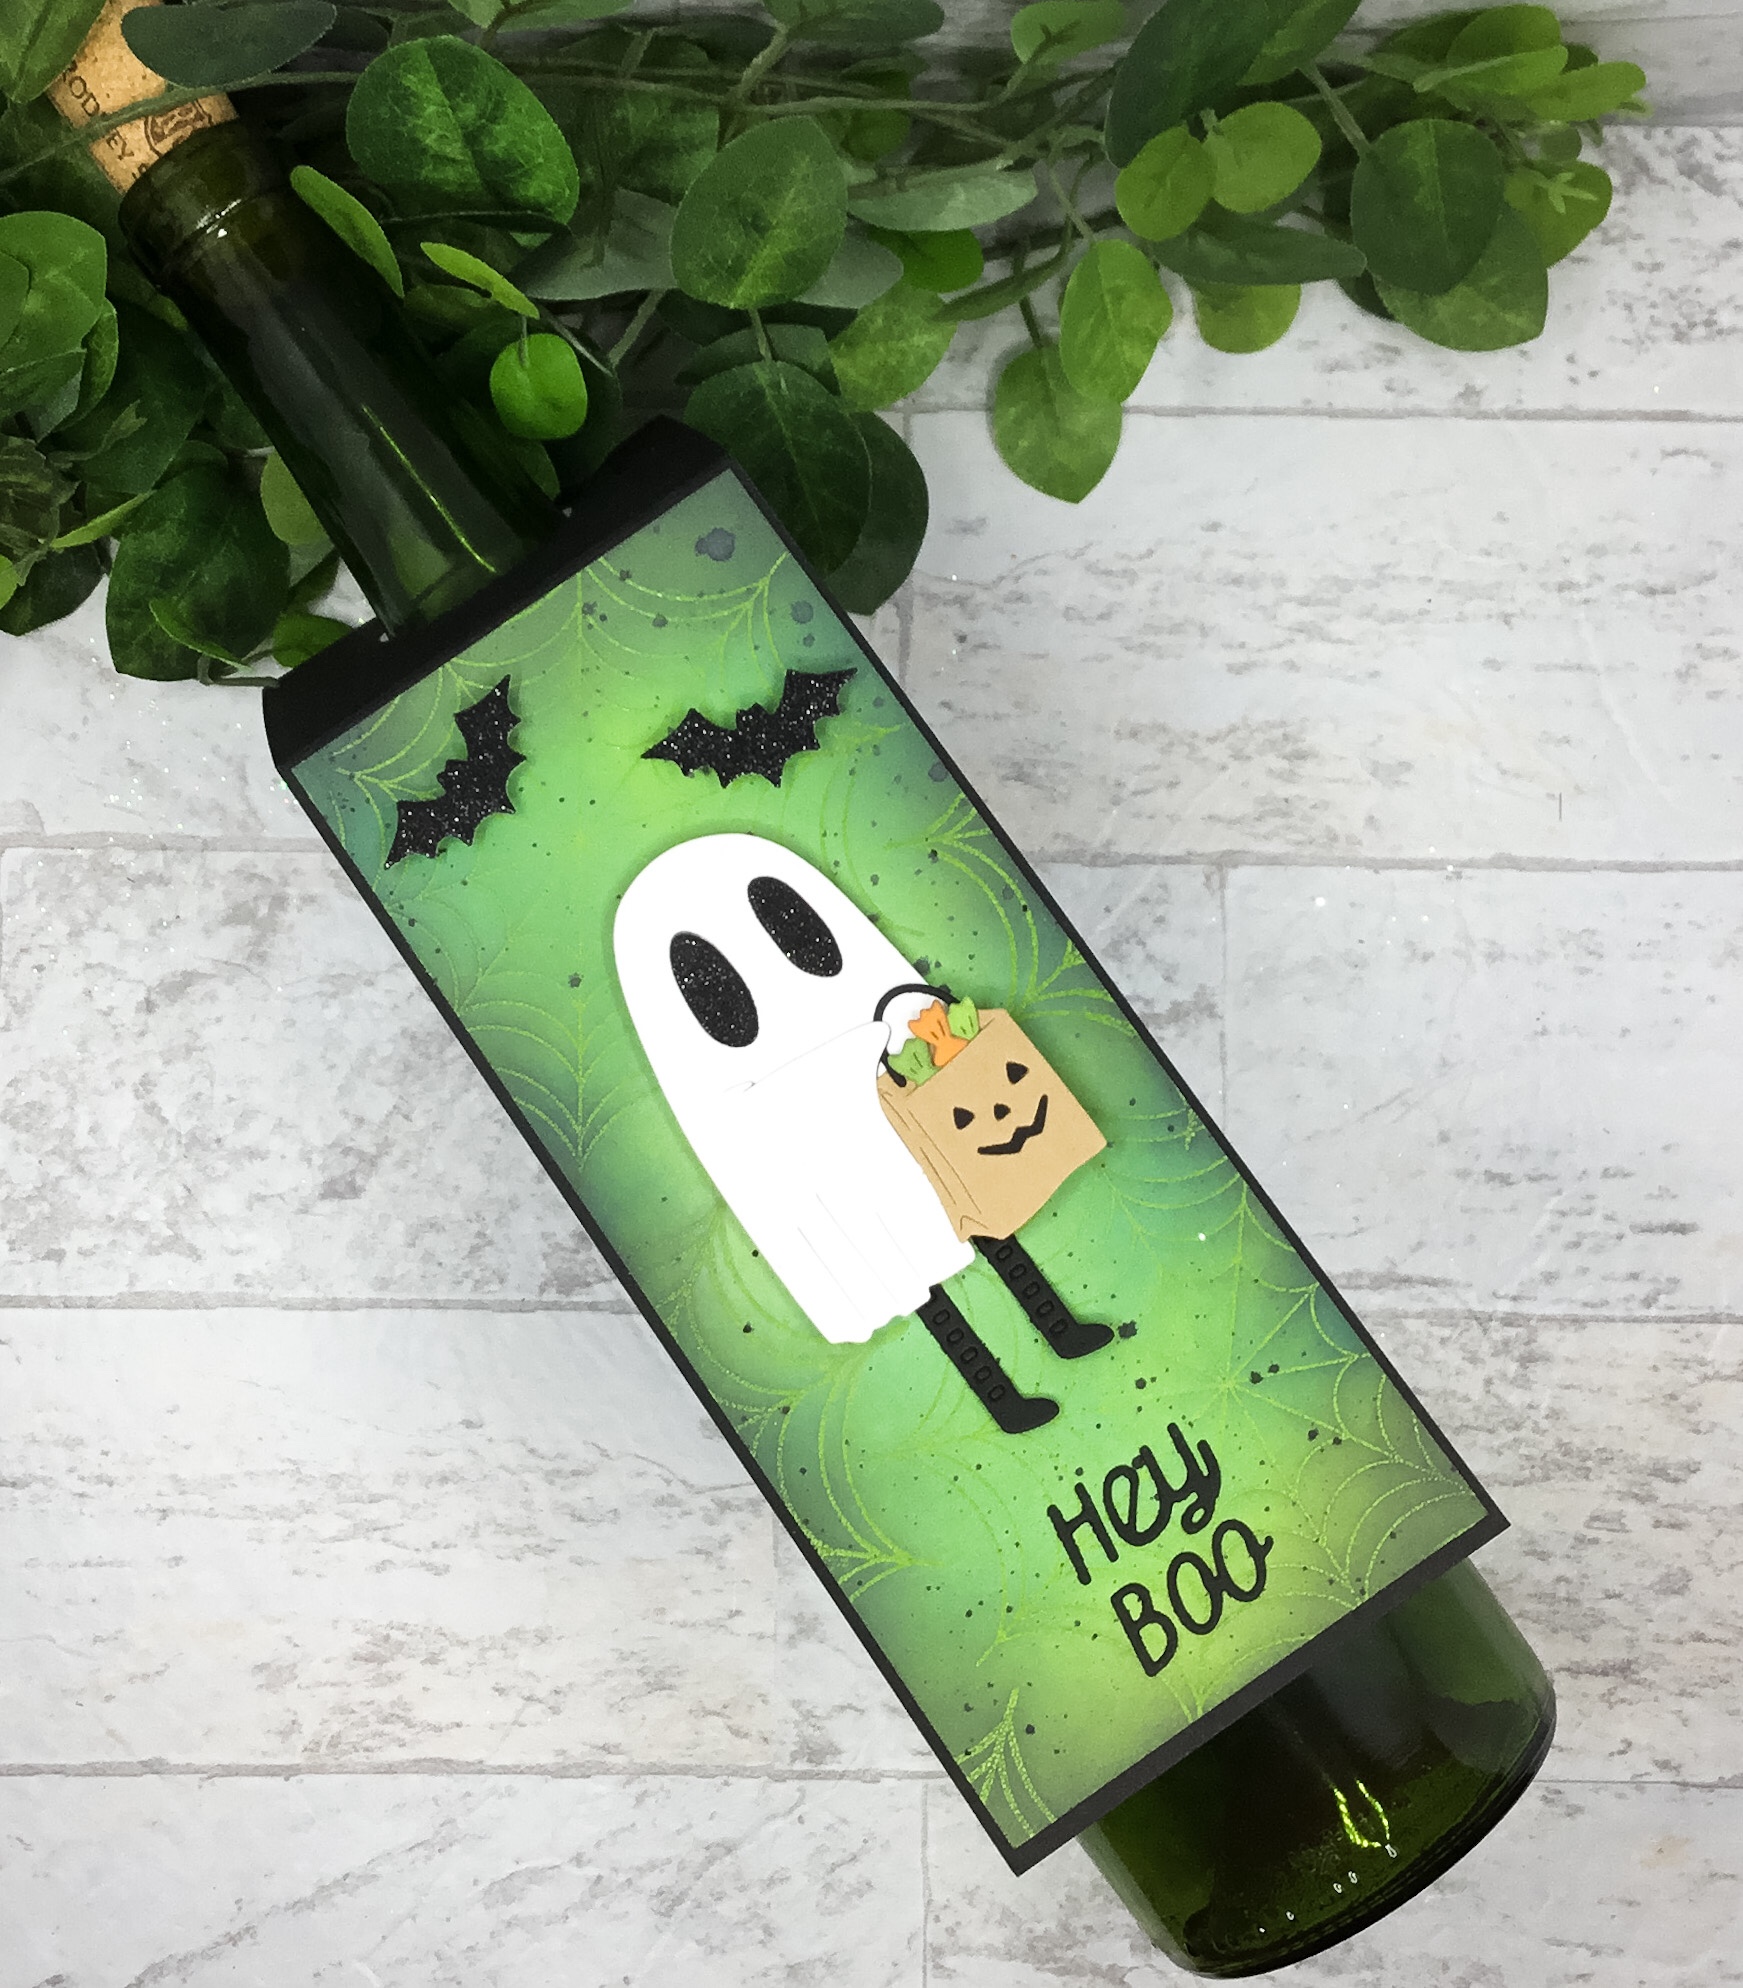
Hey Boo!
Hello crafty friends! Today I have some Halloween interactive wine labels to share with you. Who says that you have to use your supplies just for cards? I love being able to add cute tags on a wine bottle and head out to a party. These adorable Dancin’ dies from Spellbinders put a smile on my face. I can’t help but giggle when their little legs dance. The background is created by stamping a spider web with Versamark ink, applying clear embossing powder and then heat setting it on green cardstock. I used Distress Oxide Inks to add color to green cardstock. Those colors include; Twisted Citron, Mowed Lawn, Pine Needles, and Black Soot. After I added the ink, I buffed the color off of the spider webs with a soft cloth. All that was left was to add the ghost and other die cuts. These dies are very easy to use. I just couldn’t stop at the ghost. I had to see how the mummy was going to look. I have to admit, the mummy is my favorite. I repeated the same process with the exception of the background of the wine tag. This time I started with pink cardstock. I ink blended with Tattered Rose, Seedless Preserve, Dusty Concord, and Black Soot. The basic supplies are listed below. If your not feeling crafty, head to my Etsy shop to purchase the wine label already assembled for you. www.etsy.com/shop/JessieDscraftythings